Landscaping
Retaining Wall Design: Materials, Heights & Drainage
A retaining wall that looks great for a year and fails in three isn't really a retaining wall — it's an expensive way to learn about hydrostatic pressure. The difference between a wall that lasts decades and one that bulges, leans, or collapses isn't usually the material you chose. It comes down to three things that get skipped or under-engineered more often than any other: proper drainage behind the wall, an adequate buried base, and sizing the wall to the actual load it will carry. Get those three right, and almost any material will perform well.
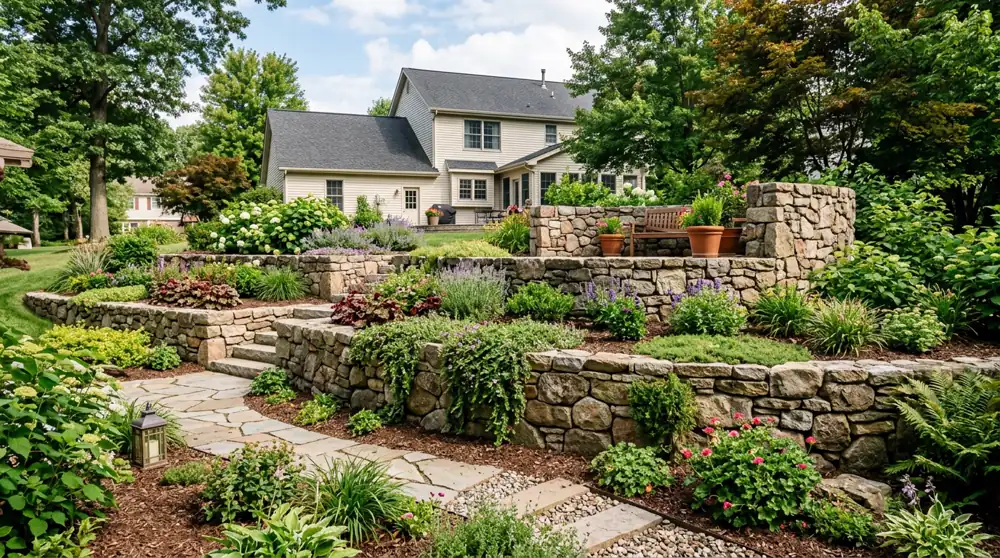
Multi-tiered walls distribute the retained load across shorter individual sections — a practical solution for slopes over 4 feet that also creates usable terraced garden space.
Understanding What a Retaining Wall Actually Does
A retaining wall holds back a mass of soil that would otherwise move downhill under gravity. The engineering challenge is that soil — especially when wet — exerts significant lateral (sideways) pressure on whatever is holding it. This pressure isn't static. It changes with soil type, moisture content, the angle of the slope, any surcharge load above the wall (driveways, patios, structures, vehicles), and temperature in freeze-thaw climates.
A well-designed retaining wall resists that lateral pressure through a combination of its own weight, the geometry of its cross-section, the strength of its footing, and — critically — a drainage system that prevents water from amplifying the soil pressure it was already designed to handle. When any of these elements is missing or undersized, failure is a matter of time rather than chance.
Height: When You Need an Engineer
Wall height is the single most important variable in retaining wall design, and the one that most reliably determines whether you need a structural engineer involved.
As a general rule across most North American jurisdictions, retaining walls up to 3 to 4 feet in exposed height can be built without an engineer's stamp, using manufacturer-published segmental block guidelines. Once you exceed that threshold — or when a wall of any height is within 10 feet of a structure, a property line, a driveway, or a public right-of-way — most building departments require a permit, engineered drawings, and inspections.
For slopes that need more than 4 feet of height change, tiered walls — multiple shorter walls separated by a level terrace — are often the practical solution. Each individual tier stays within the no-engineer zone, the load is distributed across multiple walls, and the terraces create usable landscape space. A common rule of thumb for tiered walls: the horizontal distance between wall faces should be at least twice the height of the lower wall.
Retaining Wall Materials: A Practical Comparison
Each material has genuine strengths and real limitations. The right choice depends on the wall's height and load, your budget, the aesthetic you're after, and how much maintenance you're willing to do over time.
| Material | Typical Height Range | Relative Cost | Lifespan | Best For |
|---|---|---|---|---|
| Segmental Concrete Block | Up to 6 ft (DIY); higher with geo-grid | Moderate | 50+ years | Most residential applications; engineered systems available for taller walls |
| Natural Stone (dry-stacked) | Up to 3–4 ft | High—Very High | Decades to indefinite | Aesthetic-driven projects; informal garden walls; skilled stone masons |
| Poured Concrete | Any height (engineer required above 4 ft) | High | 50+ years | High-load walls; commercial applications; where appearance will be clad |
| CMU (Concrete Masonry Unit) | Any height with engineering | Moderate—High | 50+ years | Taller structural walls; when poured concrete forms aren't practical |
| Timber / Railroad Ties | Up to 4 ft | Low—Moderate | 10–20 years | Low-load garden walls; temporary solutions; budget applications |
| Gabion (stone-filled wire baskets) | Up to 10 ft with engineering | Moderate | 30–50 years | Erosion control; naturalistic aesthetics; areas with poor-quality local stone |
Segmental Concrete Block
This is the go-to material for most residential retaining walls, and for good reason. Manufacturers like Versa-Lok, Allan Block, and Anchor publish detailed installation manuals with engineering data — which means you know exactly what the system will hold at a given height and setback. Blocks are interlocking, require no mortar, and are available in many textures and colors that can be made to look like natural stone. For walls above 4 feet, most systems allow the addition of geosynthetic grid (a buried reinforcement layer that extends back into the retained soil) to dramatically increase capacity without requiring a larger block cross-section.
Natural Stone
A dry-stacked natural stone wall is beautiful in a way that manufactured block rarely matches — and skilled stonework genuinely appreciates in value over time. The trade-off is cost (both for material and skilled labor) and the reality that dry-stacked walls rely on gravity, friction, and the mason's judgment rather than a tested engineering system. For walls up to 3 or 4 feet with moderate loads, a well-built dry-stacked stone wall is perfectly structural. Beyond that, mortar and engineering are typically needed.
Timber
Pressure-treated timber is inexpensive and easy to work with, making it a popular choice for low garden walls. The limitation is lifespan — even treated timber in contact with soil typically lasts 10 to 20 years before decay becomes structural. If you choose timber, use timbers rated for ground contact (UC4B or UC4C treatment), and plan for eventual replacement. Timber is not appropriate for walls carrying significant surcharge loads.
The Drainage System: Your Wall's Most Important Feature
No section of a retaining wall guide is more important than this one. Water trapped behind a retaining wall is responsible for the overwhelming majority of retaining wall failures — not material defects, not poor block quality, not freeze cycles on their own. It is water.
Here's why: dry soil exerts lateral pressure based on its weight and the angle of internal friction. When that same soil becomes saturated, it behaves more like a fluid and exerts hydrostatic pressure in addition to soil pressure. The combined load can be several times greater than the dry-soil design load the wall was built to handle. Add a freeze-thaw cycle to saturated soil, and the expansion force alone can crack or displace almost any wall.
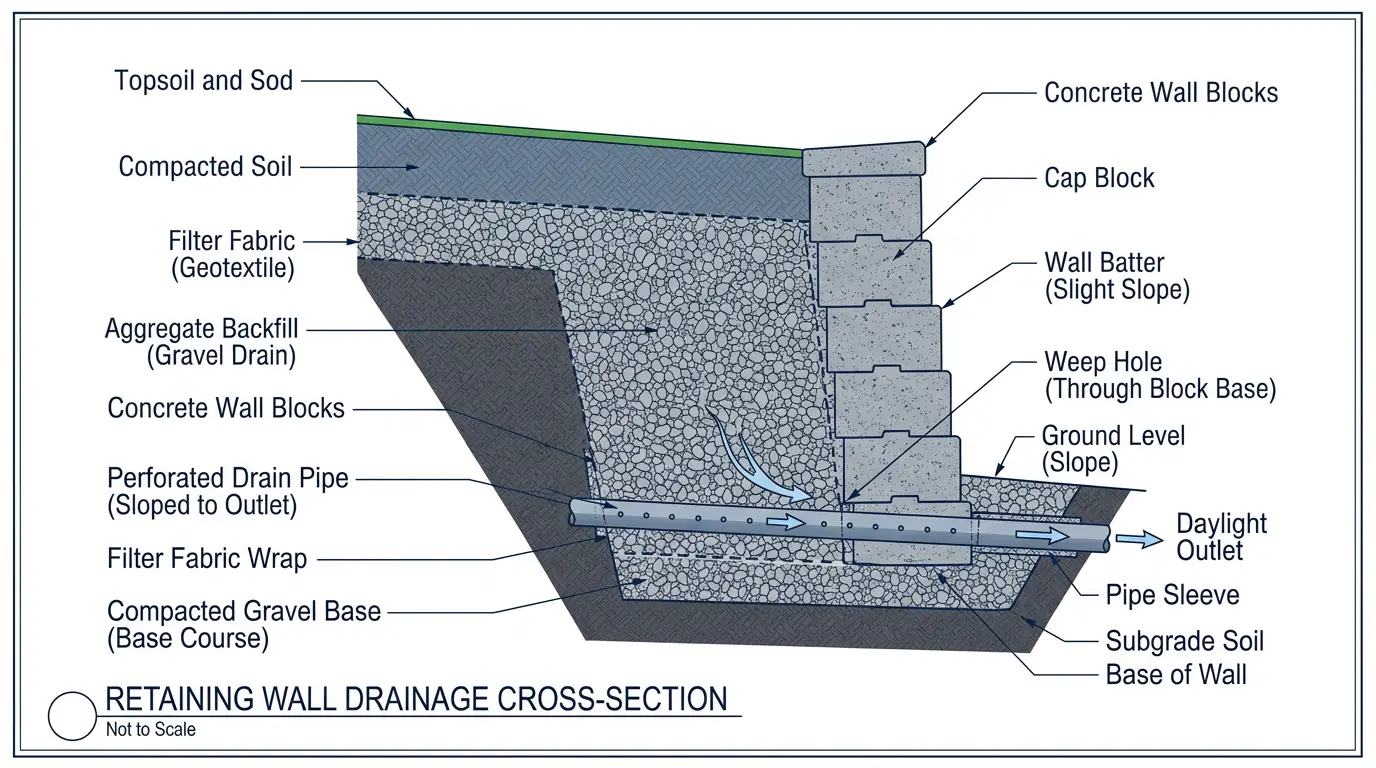
A complete retaining wall drainage system: filter fabric wrapping the gravel zone prevents soil migration, the perforated pipe collects water, and the outlet daylight prevents pressure buildup behind the wall face.
The standard drainage assembly — layer by layer
Don't compromise on drainage to save money or time. The gravel, fabric, and pipe together add relatively little cost to a retaining wall project but represent the single biggest factor in whether the wall holds up for 5 years or 50.
Foundation and Batter: The Structural Essentials
Buried base depth
The first course of blocks must be buried below grade — both to anchor the wall against sliding and to get it below the frost depth in cold climates. A common minimum is 6 inches of burial, but many engineers and manufacturers recommend burying one course for every foot of finished wall height. A 3-foot wall should have at least one full block course below grade; a 4-foot wall should have more. In areas with significant frost penetration (northern US, Canada), consult local frost depth data and set the footing accordingly.
Batter (backward lean)
Most segmental retaining wall systems are designed with a slight backward lean — called batter — built into the block geometry. Batter is typically 1 inch per foot of wall height, moving the face of the wall slightly toward the retained soil as you build upward. This lean shifts the wall's center of gravity toward the retained side, improving resistance to overturning. Never build a retaining wall plumb (perfectly vertical) unless you're using a mortar-set or poured-concrete system specifically designed for it.
Geosynthetic reinforcement for taller walls
For walls above 4 feet using segmental block, geogrid — a grid of polymer straps buried in the soil at defined intervals as you build — is the standard solution for increasing wall capacity without increasing block size. The grid extends back into the retained soil a distance calculated by the engineer or by the manufacturer's design charts, creating a gravity mass of reinforced soil that acts as a monolithic unit. Always follow the manufacturer's geogrid spacing and embedment length specifications exactly — these are structural values, not suggestions.
Surcharge Loads: What's Behind and Above the Wall
A wall that backs up to a flat lawn is a very different engineering problem than a wall that supports a driveway, a parking pad, a deck, or a structure above the retained zone. These surcharge loads add significantly to the lateral pressure the wall must resist.
As a practical rule: if any of the following will be within a horizontal distance of twice the wall height from the back of the wall, the design should account for surcharge load — which typically means engineering review:
- Driveways or parking areas subject to vehicle loads
- Structures, sheds, or outbuildings
- Patios or decks with significant live load
- Swimming pools (especially when full)
- Large trees — mature tree roots can exert significant lateral pressure and also extract moisture asymmetrically, causing seasonal movement
Common Design Failures and How to Avoid Them
- No drainage whatsoever. Still the most common mistake on DIY walls. If there's no gravel, no pipe, and no weep holes, it's a question of when — not if — the wall will fail.
- Building too tall for the system. Segmental block walls above 4 feet without geogrid, or above the manufacturer's maximum height, are under-built for the load. The wall may look fine at first and fail years later when cumulative soil pressure exceeds its capacity.
- Inadequate buried base. A wall sitting on unprepared native soil with no buried course will slide forward or settle unevenly, especially after rain.
- Wrong backfill material. Backfilling directly against the wall with clay or heavy native soil holds water and expands with freeze-thaw cycles. Use clean gravel for the first 12–18 inches behind the wall.
- Skipping the filter fabric. Gravel drainage zones without fabric become clogged with soil fines within a few years, losing their drainage function entirely.
- Building in sections without accounting for drainage outlet location. The drain pipe needs somewhere to go. Plan the outlet location before you start — not after the wall is done.
When You Absolutely Need an Engineer
Some situations are beyond the scope of homeowner design regardless of how confident you feel or how well you've built walls before. Call a licensed structural or geotechnical engineer for any wall that:
- Exceeds 4 feet in retained height (in most jurisdictions)
- Is within 10 feet of a structure, property line, or right-of-way
- Will carry a significant surcharge load (driveway, structure, pool)
- Is being built on a slope that shows any signs of existing movement or instability
- Involves expansive clay soils, high groundwater, or saturated conditions
- Is replacing a failed wall — especially if the original failure cause hasn't been identified
Building a Block Wall? Estimate Your Materials
Use our CMU Block Calculator for masonry retaining walls — get block counts, mortar, rebar, and cost estimates from your wall dimensions.
Frequently Asked Questions
How tall can a retaining wall be without an engineer?
Most local codes allow DIY walls up to 3 to 4 feet of exposed height without an engineer's stamp. Walls above this threshold — or walls near structures, driveways, or property lines at any height — typically need engineering review and a building permit. Call your local building department to confirm the exact threshold for your area.
What is the best material for a retaining wall?
Segmental concrete block is the most practical choice for most residential projects: cost-effective, engineered for the application, and available in attractive textures. Natural stone is beautiful but requires skilled labor. Timber is cheap but short-lived. Poured concrete and CMU are best for taller or heavily loaded walls.
Why is drainage so important for retaining walls?
Water trapped behind a wall dramatically increases lateral pressure — often to several times the dry-soil load the wall was designed to carry. A proper drainage system (gravel columnrforated pipe, filter fabric, weep holes) controls this pressure by removing water before it accumulates.
How deep should a retaining wall footing be?
The base course should be buried at least 6 inches below grade for the shortest walls — deeper as height increases. A common guideline is one buried course per foot of wall height. In cold climates, bury the base below the local frost depth to prevent freeze-thaw heave from shifting the wall.